Form Gadget React Tutorial (10 mins)
Form Gadgets can be easily integrated into React applications.
A finished version of the project can be accessed from the following link: Form Gadget - React
Below is a tutorial to add a Form Gadget to a newly created React App.
Create a new React App using Create React App
npm install -g create-react-app
npx create-react-app form_gadget_react
cd form_gadget_react
npm start
Add the react-script-tag Dependency
npm install --save react-script-tag@^1.1.2
Create A New React Component
We're going to create a new React Component ContactFormGadget that will render the Form Gadget.
import React from 'react';
import ScriptTag from 'react-script-tag';

class ContactFormGadget extends React.Component {
    constructor(props) {
        super(props);
    }

    render() {
        const formGadgetSrcUrl = 'https://www.formgadget.com/static/dist/formgadget.js?formId=' + this.props.formId;
        //outer container div is required so that form is properly unmounted
        return (
            <div>
                <ScriptTag isHydrating={false} type='text/javascript' src={formGadgetSrcUrl} />
            </div>
        );
    }
}

export default ContactFormGadget;
Add the new React Component to your application. For our example we'll add it to the App.js file:
import React from 'react';
import ContactFormGadget from './ContactFormGadget';

function App() {
  return (
    <div className="App">
      <ContactFormGadget formId='FORM_GADGET_FORM_ID' />
    </div>
  );
}

export default App;
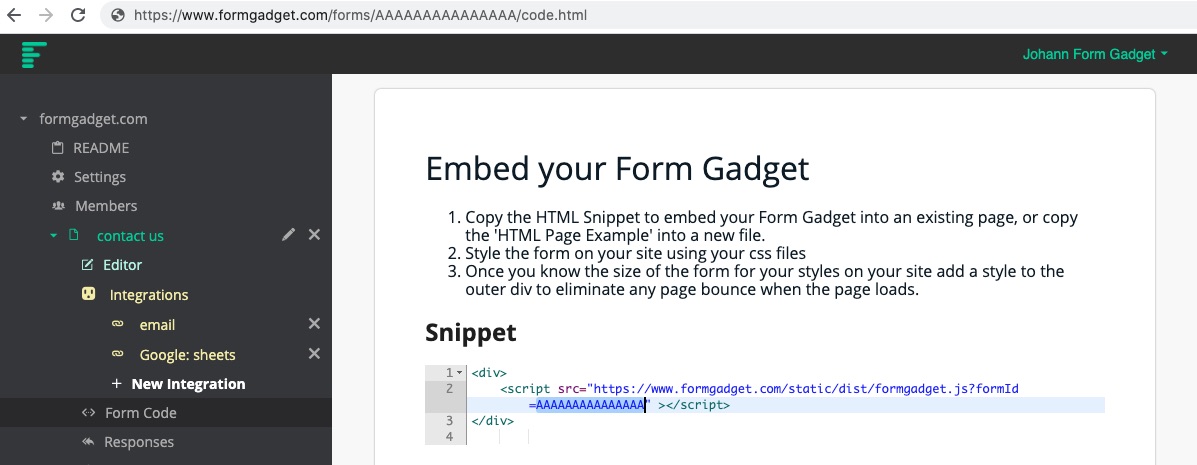
Replace FORM_GADGET_FORM_ID with the form id which can be found by logging into Form Gadget, navigating to the ${Form_Name} -> 'Form Code' and copying the formId parameter of the embed code.

If you submit the form, you'll see we don't see a success message, we'll fix that next.
Show A Success Message
Next we're going to show a different message when the form is successfully submitted.
import React from 'react';
import ScriptTag from 'react-script-tag';

class ContactFormGadget extends React.Component {

    constructor(props) {
        super(props);
        this.state = {formSuccessfullySubmitted: false};
    }

    render() {
        const formGadgetSrcUrl = 'https://www.formgadget.com/static/dist/formgadget.js?formId=' + this.props.formId;
        //outer container div is required so that form is properly unmounted
        return (
            <div>
                {this.state.formSuccessfullySubmitted
                    ? <h3>Form Submitted</h3>
                    : <ScriptTag isHydrating={false} type='text/javascript' src={formGadgetSrcUrl} />
                }
            </div>
        );
    }
}

export default ContactFormGadget;
As you can see we have a new state variable, but the value never changes. Next we'll use the Form Gadget Post Submit event to update our state variable.
Update The formSuccessfullySubmitted State
import React from 'react';
import ScriptTag from 'react-script-tag';

class ContactFormGadget extends React.Component {

    constructor(props) {
        super(props);
        this.state = {formSuccessfullySubmitted: false};
        this.formGadgetPostSubmit = this.formGadgetPostSubmit.bind(this);
    }

    formGadgetPostSubmit(event) {
        /* An event is fired after the AJAX request has been completed.  The event will include the request and response object, so it will be possible to show success or failure messages.  By default the Javascript will attempt to place an error message string inside an html element inside the form that has a 'form-gadget-form-error' class. */
        console.log('form-gadget-post-submit [event]', event);
        if(event.detail.request.status === 201) {
            event.detail.form.remove();
            this.setState(state => ({
              formSuccessfullySubmitted: true
            }));
        }
    }

    componentDidMount() {
        document.addEventListener('form-gadget-post-submit', this.formGadgetPostSubmit);
    }

    componentWillUnmount() {
        document.removeEventListener('form-gadget-post-submit', this.formGadgetPostSubmit);
    }

    render() {
        const formGadgetSrcUrl = 'https://www.formgadget.com/static/dist/formgadget.js?formId=' + this.props.formId;
        //outer container div is required so that form is properly unmounted
        return (
            <div>
                {this.state.formSuccessfullySubmitted
                    ? <h3>Form Submitted</h3>
                    : <ScriptTag isHydrating={false} type='text/javascript' src={formGadgetSrcUrl} />
                }
            </div>
        );
    }
}

export default ContactFormGadget;
Congratulations, you have successfully added a Form Gadget to your React application!
Appendix - Adding All The Event Listeners
import React from 'react';
import ScriptTag from 'react-script-tag';

class ContactFormGadget extends React.Component {

    constructor(props) {
        super(props);
        this.state = {formSuccessfullySubmitted: false};
        this.formGadgetPostValidate = this.formGadgetPostValidate.bind(this);
        this.formGadgetPreSubmit = this.formGadgetPreSubmit.bind(this);
        this.formGadgetPostSubmit = this.formGadgetPostSubmit.bind(this);
    }

    formGadgetPostValidate(event) {
        /* An event is fired after the form has been validated.  It is possible to add custom validations by listening for the event and changing the event.details object. All events include a reference to the form as well. */
        console.log('form-gadget-post-validate event', event);
    }

    formGadgetPreSubmit(event) {
        /* An event is fired before the AJAX request.  It's possible to change the request body by changing the data attribute in the event.detail.data object. */
        console.log('form-gadget-pre-submit event', event);
    }

    formGadgetPostSubmit(event) {
        /* An event is fired after the AJAX request has been completed.  The event will include the request and response object, so it will be possible to show success or failure messages.  By default the Javascript will attempt to place an error message string inside an html element inside the form that has a 'form-gadget-form-error' class. */
        console.log('form-gadget-post-submit [event]', event);
        if(event.detail.request.status === 201) {
            event.detail.form.remove();
            this.setState(state => ({
              formSuccessfullySubmitted: true
            }));
        }
    }

    componentDidMount() {
        console.log('componentDidMount');
        document.addEventListener('form-gadget-post-validate', this.formGadgetPostValidate);
        document.addEventListener('form-gadget-pre-submit', this.formGadgetPreSubmit);
        document.addEventListener('form-gadget-post-submit', this.formGadgetPostSubmit);

    }

    componentWillUnmount() {
        console.log('componentWillUnmount');
        document.removeEventListener('form-gadget-post-validate', this.formGadgetPostValidate);
        document.removeEventListener('form-gadget-pre-submit', this.formGadgetPreSubmit);
        document.removeEventListener('form-gadget-post-submit', this.formGadgetPostSubmit);
    }

    render() {
        const formGadgetSrcUrl = 'https://www.formgadget.com/static/dist/formgadget.js?formId=' + this.props.formId;
        //outer container div is required so that form is properly unmounted
        return (
            <div>
                {this.state.formSuccessfullySubmitted
                    ? <h3>Form Submitted</h3>
                    : <ScriptTag isHydrating={false} type='text/javascript' src={formGadgetSrcUrl} />
                }
            </div>
        );
    }
}

export default ContactFormGadget;